Fantasy Room Level 15 - Luxury Hotel Suite
Design a luxurious hotel suite with bedroom, living area, and premium amenities for the ultimate guest experience. - Fantasy Room Level 15 Strategy & Solutions
Important Notice
Due to level number adjustments in the app and different update progress between iOS and Android platforms, the text guide below may not match the images and videos above. Please prioritize images and videos. If you find that the guide content doesn't match your current level, please visit View All Level Walkthroughs to find the correct guide through images. Thank you for your understanding.
Introduction
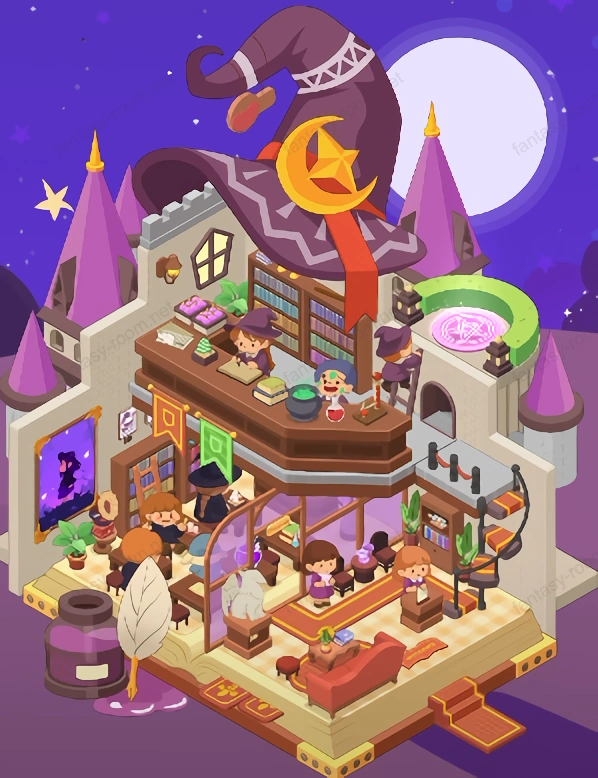
This is a magic academy built on giant book, roof is exaggerated wizard hat, steps and corridor connect upper-lower two floors. You need to place podium, bookshelf, alchemy table, potion vessels, apprentice seats, flags and teleportation array in sequence, making teaching circulation clear: enter visit, attend class, prepare, display, rest, leave. Follow steps to place each prop to appropriate position, room will light up warm golden light, full of academy atmosphere.
Arrangement Steps
Step 1: Place Giant Book Platform
Spread open giant book at scene bottom, let book pages face front side forming outer edge. Giant book is this level basic floor, meanwhile implies walking route. When placing let book spine slightly left, making book page outer edge just align with lower right stairs, leaving continuous walkway for subsequent sofa area and display table. After straightening, room will appear weak page-turning glow effect, indicating load-bearing and height locked.
Step 2: Set Lower Right Stairs
Align golden small stairs to book page gap, stair surface and platform seamlessly fit. Stairs positioning very critical, it both entrance to academy, also exit leaving toward terrace. In angle let stairs slightly toward lower right, convenient for character going upstairs from screen outer side, meanwhile not blocking subsequently placed long sofa and side table. Test walking position can smoothly up-down then continue.
Step 3: Lay Central Passage and Round Carpet
Place light golden passage line on book page centerline, extending from entrance to podium front. Then lay round-corner carpet on passage left side, as center point of reception and discussion area. Carpet should leave one-fist-width gap with back display table, ensure interaction not crowded. This way walking route will naturally divert, watching, sitting and passing not interfere each other.
Step 4: Place Red Long Sofa
Place red long sofa at passage left side front, back against book page edge, face toward podium direction. Sofa slightly outward cut into arc, fitting book page round corner, can form comfortable viewing position. Reserve space for small round table and quill seat in front of sofa, convenient for apprentices to record while listening. After sofa placed stable, cushions will appear slight elastic animation, this is correct position prompt.
Step 5: Arrange Quill and Ink Base
Place huge quill and round ink stand at sofa front near passage side. Pen tip faces podium, symbolizing recording inspiration. Note not to top character walking line, keep half-grid distance from sofa front edge. Quill and sofa form sight guidance, visitors will naturally pause here briefly then enter inner teaching area.
Step 6: Set Apprentice Reception and Display Cabinet
Place two wooden small pedestals at right rear of sofa, display magic scrolls and crystal samples on top. Pedestals should arrange along passage outer edge, letting visitors can watch while walking. Leave half-grid spacing between two pedestals, both appears orderly, also not affecting subsequently placed arched door frame structure. After straightening pedestals will appear weak golden light, indicating display can interact.
Step 7: Build Arched Door Frame and Glass Partition
Install arched door frame to back of display cabinet, making it frame inner hall, supporting half-height glass partition extends along passage inner side. This combination both divides study area and display area, also not blocking sight. Door frame wood color should be consistent with podium, bookshelf, ensuring style unified. After installation, indoor light will be softened, academy appears quieter.
Step 8: Place Podium and Main Bookshelf
Place second floor corner podium at upper floor platform front edge, tabletop faces lower floor audience. Place tall main bookshelf tightly against wall behind podium, forming authoritative teaching background. Reserve right side of podium for device ladder and upper floor side rail, avoid character stuck position. After podium placed stable, dark green book back and golden book spine will light up in sequence, prompting completion improvement.
Step 9: Place Alchemy Table and Potion Vessels
Place alchemy table set on corner platform at front left of podium, beside sequentially place crucible, measuring cup and small bottles. Crucible best near outer edge little, convenient for displaying smoke and bubble effect; glass vessels inside, reducing drop risk. This way teacher can demonstrate while teaching, tabletop keeping tidy. After placing correctly pink-purple steam effect will appear, atmosphere maxed.
Step 10: Hang Academy Flags and Ornaments
On upper floor railing board outer facade, hang three different colored hanging flags from left to right, colors sequentially gold, red, green, symbolizing three school systems. Flag distance from ground should be unified, and not overlap with downstairs door frame. Hanging flags both enrich facade, also can provide dynamic feeling when camera moves. After placing cloth will gently swing, indicating wind direction effect loaded.
Step 11: Set Right Side Spiral Rack and Plants
Place metal spiral rack beside right stairs, layer by layer place test tubes, scrolls and small potted plants. Lowest layer leave empty to ensure character walking. Spiral rack most beautiful when parallel with stair handrail, also avoid clipping when subsequently placing teleportation gate. Plants soften metal cold feeling, overall more life-like.
Step 12: Place Upper Floor Apprentices and Instructor Standing Position
Place two apprentices and one instructor in front-back relationship near podium: instructor centered, apprentices stand on both sides. Character facing should uniformly face audience, and keep half-grid safety distance from props, prevent interaction lag. After characters placed, overhead dialogue bubbles and book-flipping actions will trigger, scene immediately lively.
Step 13: Place Upper Right Moon Wheel Teleportation Array
Place glowing round teleportation array on upper right outer platform, edge aligns with witch tower base. This device used for leaving after course ends and remote access, must keep clear broken-line circulation with stair platform. After placing correctly will appear slowly rotating moon wheel and rune particles, visual center of gravity naturally raised.
Step 14: Set Left Side Magic Mural and Window Lamp
Hang purple silhouette mural on first floor left wall, supplement wall lamp above, light washes wall downward. Mural slightly upward, avoid collision with student seats. After lighting on, soft-edge highlight will appear around frame, making visitors first glance attracted to teaching theme.
Step 15: Arrange Student Seats and Desks
Place three sets desks and stools at first floor middle, sequentially arrange from left to right along passage inner side. Leave half-grid distance between each set, convenient for entry-exit. Set near arch slightly retreat, forming natural classroom layers. After placing, books and quill pens will auto-generate, indicating can start learning actions.
Step 16: Place Alchemy Material Cabinet and Test Table
Place material cabinet against wall on first floor right side, tabletop place alcohol lamp, flask and powder jar. Cabinet body should offset with stair starting step avoid blocking. It forms demonstration-practice closed loop with upper floor podium alchemy table, players can intuitively see circulation reasonable. After placing will appear small-range blue flame effect.
Step 17: Supplement Green Plants and Niche Small Lights
Place hanging green plant pot each at stair corner and door frame both sides, wall embed small niche lights. Green plants weaken hard edges, making sight softer; niche lights strengthen night class atmosphere. Note plants not to touch character head height, ensure passing unobstructed. Light level below character, avoid glare.
Step 18: Roof Wizard Hat and Crescent Badge Calibration
Place exaggerated wizard hat roof on top of second floor, crescent badge centered hanging. Red ribbon naturally falls above podium, becoming whole scene visual anchor. Hat brim needs leave fine seam with both side sharp towers, giving starry sky background light transmission. After calibration success, wind blowing fabric and star point twinkling will appear synchronously, overall texture enhanced.
Step 19: Lay Outer Edge Bookmark and Edge Binding
Stick golden bookmark and corner decoration on book page right front, supplement small edge binding strip at left back. They both play sealing role, also gather viewing sight toward center. After completing this step, glowing letters on floor will briefly light up, prompting level core furnishings all in place.
Precautions
- Hierarchy and Blocking: Character, podium, flag, railing board front-back hierarchy should be clear, avoid flag pressing character head or arch and character intersecting.
- Passage Width: Passage, stair entrance, teleportation array surroundings at least leave half-grid to one-grid gap, ensure upper-lower floor switching smooth.
- Symmetry and Echo: Main bookshelf, display table, spiral rack in color and material echo podium, avoid abrupt different color wood grain appearing.
- Glowing Props: Alchemy table, teleportation array, wall lamp light intensity not overlay excessively, single point highlight, surface soft light more comfortable.
- Safety Distance: Between crucible and sittable object must leave interaction distance, prevent sitting and preparing action conflict.
Tips and Tricks
- First Set Circulation Then Place Items: Use passage line and stairs to first sketch entrance-viewing-attending class-practicing-teleporting route, then fill props, higher efficiency.
- Layered Preview: Multiple times open upper floor and lower floor overhead preview, check railing board, flags and character relative position, timely adjust avoid blocking.
- Light Source Partition: Podium use warm light, alchemy table use cold light, teleportation array use pink-purple light, three-color partition makes layers clearer.
- Props Group Copy: Desks-chairs, display tables, bottles-jars etc. place in groups, can keep arrangement spacing consistent, overall more tidy.
- Dynamic Props Decoration: Place small amount moving items at visual focal point, such as ribbons, flags and steam, other areas keep static, avoid picture noisy.
Key of this level is to straighten teaching circulation and hierarchy relationship at once: entrance reception, lower floor teaching, upper floor demonstration, upper right leaving. Podium and bookshelf constitute spiritual core, flags and ribbons enhance ceremonial feeling, teleportation array and spiral rack complete fantasy flavor. After completion, this academy built on giant book brightly lit, apprentices busy and orderly, both has academy solemnity, also retains fairy tale gentleness and romance.