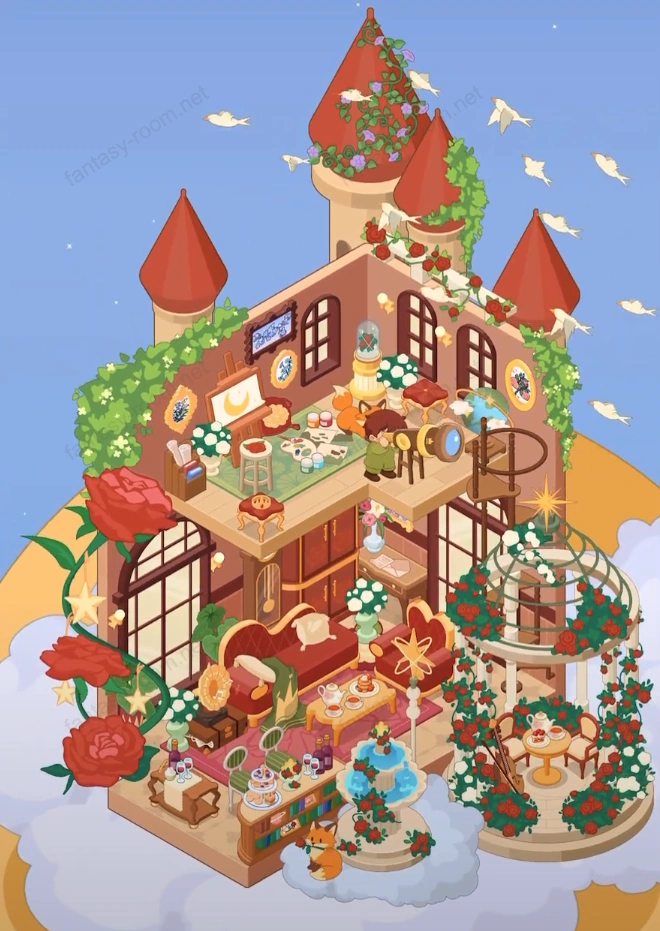
Fantasy Room Level 35 - Rose Kingdom
Create this beautiful two-story Rose Kingdom! The first floor has a luxurious living room with bar, flower pavilion and fountain. The second floor has an art area with easels, telescopes, and castle towers in the background. - Fantasy Room Level 35 Strategy & Solutions
Important Notice
Due to level number adjustments in the app and different update progress between iOS and Android platforms, the text guide below may not match the images and videos above. Please prioritize images and videos. If you find that the guide content doesn't match your current level, please visit View All Level Walkthroughs to find the correct guide through images. Thank you for your understanding.
This level is a dream-themed double-layer palace scene, designed with the concept of "cloud rose garden". The main color tone is wine red, gold and ivory white, complemented by dark green vegetation and vines. The bottom layer is a romantic reception hall and garden terrace, while the upper layer is an art attic and observatory. The level has extremely rich details and requires precise symmetrical layout, it is a level that tests patience and aesthetics.
Step 1: Basic Structure
First place the main room foundation, using red-brown brick walls. Lay beige patterned floor tiles on the bottom layer, extend a circular balcony on the right platform, and surround with clouds to form a "floating" spatial feeling.
Step 2: Main Staircase Installation
Install a spiral staircase in the right rear, connecting to the upper floor. Keep the bottom of the staircase transparent, leaving foreground view, convenient for subsequent placement of decorations.
Step 3: Bottom Layer Carpet and Furniture
Lay a red long carpet in the center of the room, place gold-edged red sofa, single seat and wooden tea table. Place classic standing clock and bookshelf in the left rear, forming a warm living room area.
Step 4: Windows and Plant Decoration
Install arched windows on both left and right walls, and place green potted plants in front of windows. Wall light shines in through windows, forming soft brightness changes.
Step 5: Right Terrace Structure
Install columns on the right circular platform, arrange round tables and double chairs around the center, becoming outdoor tea seat. Lay wood grain floor tiles on the ground to add material layers.
Step 6: Fountain and Cloud Layer Layout
Place a blue fountain between the two areas (at the junction of living room and terrace), lay a small amount of white clouds at the bottom to connect the height difference between two layers.
Step 7: Large Rose Flower Decoration
Arrange giant red rose vines outside the left window, with some branches climbing the wall. Note to leave top space, avoid overlapping with upper layer.
Step 8: Tea Snacks and Display Details
Place tea utensils, cakes, wine glasses, vases on the tea table in front of the sofa, and place three-layer snack plates on the right counter. Overall keep symmetrical, increase visual richness.
Step 9: Lighting and Hanging Decorations
Hang wall lamps and picture frames on the walls, with gold edges as main color. Add floor lamps and butterfly-shaped lighting in the middle, making indoor more dreamlike.
Step 10: Right Pavilion Construction
Add glass dome on the terrace columns to form a complete pavilion. Surround with rose vines, hang golden star-shaped ornaments on the top, overall structure completed.
Step 11: Upper Floor Installation
Add wooden light brown flooring for the second floor and set up edge railings to maintain structure safety and layers. Upper floor is art work area and stargazing corner.
Step 12: Art Attic Layout
Place easels, palettes and canvases, with small stools and teacups beside, forming a warm creation corner. Hang paintings and wall lamps on the wall.
Step 13: Stargazing Equipment
Place telescope on the right side of the second floor, and place small tables and chairs, with star maps and cups on the table, adding life details.
Step 14: Towers and Outer Walls
Install three pointed red towers in the upper roof area, and surround tower bases with vines. Decorative flags or flower baskets can be hung between towers.
Step 15: Flowers and Vines Finishing
Rose vines can be added along stairs, window frames, railings, control density to avoid blocking main items. Hang circular flower frames on upper layer wall edges.
Step 16: Dynamic Decoration
Add flying white doves and starlight particle effects, making the scene more dreamlike.
Step 17: Light and Shadow Adjustment
Bottom layer mainly uses warm light, upper layer keeps soft light. Pay attention to fountain and lighting brightness coordination, cannot be overexposed.
Step 18: Overall Check
Confirm upper and lower layer visual coherence: bottom layer mainly "red + gold", upper layer with "light wood + green" as supplement. Main perspective maintains extension from lower left to upper right.
Tips
- •Rose vines should be evenly distributed on left and right sides, avoid picture being too heavy.
- •The spiral staircase is the core of layer connection, must be centered slightly to the right.
- •The combination of fountain and clouds can naturally cover joints, is the key to optimizing three-dimensional sense.
- •Easels and telescopes can be slightly moved forward to create spatial depth.
Warnings
- ⚠Vines in second layer and tower parts should not be too dense, otherwise it will cover window structures.
- ⚠Light color temperature should be unified, avoid mixing blue light and warm light.
- ⚠Red furniture should not all be placed against the wall, can leave some space to enhance air feeling.
- ⚠Dynamic effect elements (white doves, flashing lights) should not be too many, so as not to interfere with overall composition.